Multi-Cloud Security: Proven Methods for Safeguarding Data
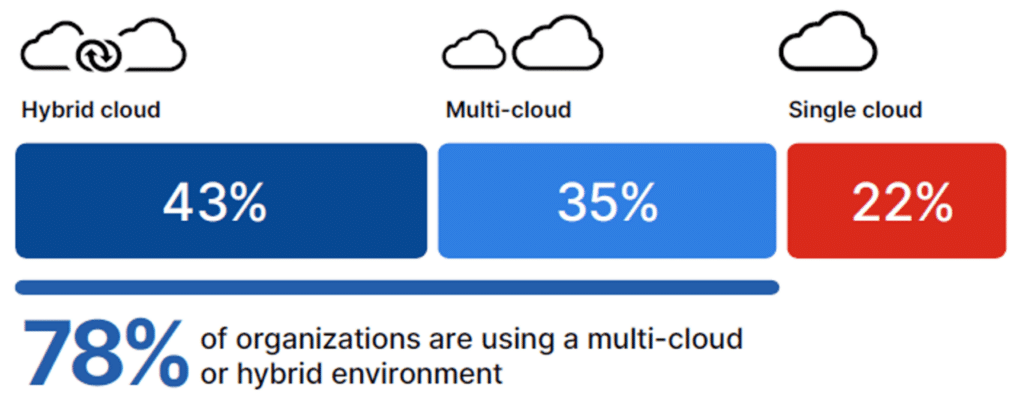
As organizations increasingly adopt diverse cloud services to meet their varying computational and storage needs, multi-cloud security emerges as a critical concern. “In 2024, a majority of organizations (78%) are opting for hybrid and multi-cloud strategies. Of those organizations, 43% use a hybrid of cloud and on-premises infrastructure, and 35% have a multi-cloud strategy,” according to the 2024 Fortinet Cloud Security Report.
This approach not only amplifies the benefits of cloud computing but also introduces complex challenges in safeguarding sensitive data and ensuring robust data governance. Thus, the significance of multi-cloud security cannot be overstated, as it plays a fundamental role in protecting data across multiple cloud environments from cyber threats, unauthorized access, and data breaches.
The Basics of Multi-cloud Security
What is Multi-cloud Security?
Multi-cloud security refers to the protective measures and strategies implemented to safeguard data, applications, and infrastructures when utilizing multiple cloud service providers such as AWS, Azure, and GCP. This approach is crucial in a world where businesses leverage diverse cloud environments to enhance flexibility, resilience, and cost optimization. It addresses the complexities of managing varied cloud resources, ensuring seamless data integration and robust security across all platforms.
Why is It Essential?
The essence of multi-cloud security lies in its ability to provide a unified security posture across various cloud platforms, which is vital for maintaining the integrity and confidentiality of sensitive data. Organizations face numerous challenges such as cyber threats, unauthorized access, and potential data breaches. Implementing a comprehensive multi-cloud security strategy mitigates these risks, enhances data governance, and supports compliance with data sovereignty requirements.
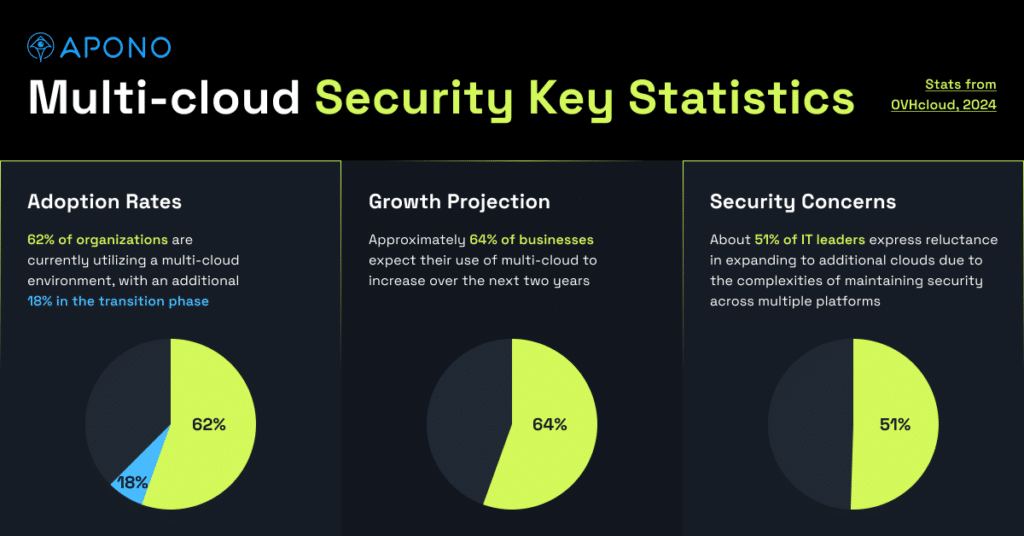
Multi-cloud Security Key Statistics
Recent studies underscore the importance and rapid adoption of multi-cloud strategies:
Adoption Rates: 62% of organizations are currently utilizing a multi-cloud environment, with an additional 18% in the transition phase.
Growth Projection: Approximately 64% of businesses expect their use of multi-cloud to increase over the next two years.
Security Concerns: About 51% of IT leaders express reluctance in expanding to additional clouds due to the complexities of maintaining security across multiple platforms.
These statistics highlight the growing reliance on multi-cloud environments and the critical need for effective security measures to protect organizational assets and ensure operational continuity.
Top Benefits of Multi-cloud Strategies
Access to Diverse Services
Multi-cloud strategies allow organizations to leverage a wide array of services from various cloud providers, each offering unique capabilities and features. By utilizing multiple clouds, businesses can select the most suited provider for specific tasks, such as one specializing in data storage and security while another excels in big data analytics. This approach not only ensures that organizations can employ the best-of-breed services for their specific needs but also fosters innovation by integrating diverse technologies like Kubernetes, which supports application portability across different environments.
Enhanced System Reliability
One of the most significant advantages of adopting a multi-cloud strategy is the improvement in system reliability and uptime. By distributing workloads across multiple cloud platforms, organizations can minimize the risk of service disruptions. If one cloud platform experiences an outage, the workload can be seamlessly shifted to another provider, ensuring uninterrupted access to resources and services. This redundancy is crucial for maintaining continuous service availability and operational continuity.
Agility and Quick Responses to Changes
Multi-cloud environments provide businesses with the flexibility to quickly adapt to changing market dynamics and technological advancements. The ability to switch between providers or distribute workloads across multiple clouds reduces the risk of vendor lock-in and enhances organizational agility. This strategic flexibility allows companies to respond swiftly to opportunities or challenges, ensuring they remain competitive in a rapidly evolving digital landscape. Additionally, the scalability of cloud resources enables organizations to efficiently manage demand spikes or decreases, optimizing cost and performance.
Key Challenges in Multi-cloud Security
Managing Increased Complexity
One of the primary challenges in multi-cloud security is managing the increased complexity that comes with operating across multiple cloud platforms. Each provider has its own set of tools, interfaces, and security protocols, making it difficult for organizations to maintain a clear oversight of their data and resources. This complexity often leads to challenges in data integration and consistent monitoring, increasing the risk of security gaps and data inconsistencies.
Achieving Consistent Security Policies
Achieving consistent security policies across various cloud environments is another significant challenge. Organizations must ensure that their security measures are uniformly enforced across all platforms to protect sensitive data from threats. However, differences in cloud architectures and service models can complicate the implementation of uniform security policies. Organizations need to develop comprehensive security frameworks that are adaptable to the specific requirements of each cloud provider while maintaining overall security standards.
Mitigating an Expanded Attack Surface
The use of multiple cloud services inherently expands an organization’s attack surface. Each additional service and integration point introduces potential vulnerabilities that could be exploited by cyber attackers. Ensuring robust security measures, such as encryption, access controls, and regular security assessments, is crucial to mitigate these risks. Organizations must also stay vigilant against emerging threats and continuously update their security practices to protect their multi-cloud environments.
Effective multi-cloud security begins with robust Identity Access Management (IAM). IAM systems control who accesses cloud resources by enforcing multi-factor authentication, role-based access control, and other security measures. This acts like a sophisticated key card system, ensuring that only authorized individuals can access specific resources within the multi-cloud environment. Regular audits of user roles and permissions help maintain this control, preventing unauthorized access and safeguarding sensitive information.
Data Encryption and Secure Transfers
Data encryption is critical for protecting data both in transit and at rest across multiple cloud platforms. Utilizing advanced encryption methods, such as AES 256-bit encryption, ensures that data remains secure, whether it is stored locally or transferred across cloud environments. Moreover, securing data transfers between different cloud platforms is essential and can be achieved through encryption and secure network connections. This layer of security protects data from being intercepted and accessed by unauthorized parties.
Regular Audits and Assessments
Conducting regular security audits and assessments is vital to uncover and address security vulnerabilities across all cloud platforms. These audits should include a comprehensive evaluation of the organization’s security posture, identifying any potential threats and vulnerabilities. By continuously monitoring the multi-cloud system in real time and regularly auditing security measures, organizations can maintain adherence to security policies and regulatory requirements, ensuring ongoing protection against potential cyber threats.
Implementing these measures will significantly enhance the security of multi-cloud environments, enabling organizations to leverage the benefits of cloud computing while minimizing risks.
Conclusion
It’s clear that the journey towards achieving secure multi-cloud environments is ongoing and requires continuous adaptation to emerging threats and evolving cloud technologies. The significance of adopting a strategic, well-rounded approach to multi-cloud security cannot be overstated, as it underpins the integrity and resilience of modern digital infrastructures. With the right mix of strategic planning, technological implementation, and constant vigilance, organizations can harness the full potential of multi-cloud computing, turning the challenges of security into opportunities for fostering innovation, enhancing system reliability, and driving business growth.
How Apono Helps
Apono secures multi-cloud environments by leveraging a robust, scalable architecture that eliminates the need for permanent credentials. It employs ephemeral certificate-based authentication, which ensures that access permissions are granted only when needed and for a limited duration. This approach minimizes the risk of credential theft and unauthorized access. Additionally, Apono facilitates centralized access management across diverse cloud platforms, allowing organizations to enforce consistent security policies. Through its seamless integration with existing identity providers and comprehensive audit trails, Apono enhances visibility and control, enabling organizations to maintain stringent security standards in complex, multi-cloud ecosystems.
The Role of Automation in Enforcing the Principle of Least Privilege
As businesses continue to expand their reliance on cloud security and privileged access management, the imperative to implement least privilege access in a manner both effective and efficient cannot be overstated. Yet, with the increasing complexity of information systems and the proliferation of privileged accounts, manually administering and enforcing the least privilege principle poses substantial challenges.
However, through automation, companies can now achieve fine-grained access control, facilitate just-in-time access, and manage temporary access with precision, thereby minimizing the potential blast radius of security incidents.
Understanding Least Privilege Access
The principle of least privilege (PoLP) is a critical concept in information security, mandating that individuals and systems have only the minimum levels of access necessary to perform their functions. This principle is essential for minimizing the risk of accidental or intentional data breaches and for maintaining a secure computing environment.
Definition and Key Principles
At its core, the principle of least privilege ensures that every module—be it a process, a user, or a program—has access only to the information and resources essential for its legitimate purpose. This approach limits the abilities of a user or program to interact with the system, thereby reducing the potential for misuse or accidental harm. For instance, a user account created solely for generating backups would not have permissions to install new software, as these rights are unnecessary for the task of backing up data.
Historical Context and Evolution
The concept of least privilege is not new and has evolved over time as systems have become more complex and interconnected. One of the earliest implementations of this principle can be traced back to the UNIX operating system, where the login.c program would start with super-user permissions and drop these privileges as soon as they were no longer necessary.
This principle has been foundational in the development of modern security architectures, influencing various frameworks and technologies. For example, the Zero Trust model incorporates the principle of least privilege at its core, requiring verification and validation of everything trying to connect to an organization’s systems before access is granted.
Implementing the principle of least privilege requires careful planning and continuous management to ensure that privileges are appropriately assigned and adjusted as needed. This involves auditing existing privileges, revoking unnecessary permissions, and monitoring for changes that might introduce risks. Organizations must also consider the dynamic nature of access requirements, as roles and responsibilities can evolve, necessitating adjustments to access privileges.
All in all, understanding and applying the principle of least privilege is essential for securing systems against unauthorized access and potential threats. By limiting users and programs to the minimum access necessary, organizations can significantly reduce their vulnerability to attacks and ensure the integrity and confidentiality of their data.
Challenges of Manual Least Privilege Access
Implementing the Principle of Least Privilege (PoLP) manually presents numerous challenges that can hinder an organization’s security framework. These challenges stem from various factors ranging from employee resistance to the intrinsic complexities of modern IT environments.
Common Issues and Pitfalls
Employee Frustration: Manual enforcement of PoLP often leads to user and administrator frustration, especially in environments where speed and automation, such as DevOps, are prioritized. The friction caused by access restrictions can lead to increased administrative overhead and reduced productivity.
Complexity of Computing Environments: With assets spread across on-premises, cloud, and hybrid environments, managing access becomes increasingly complex. Each platform may have its own set of access management tools and policies, which complicates the implementation of a unified least privilege strategy.
Lack of Granularity: Most operating systems and environments do not support the fine-grained control necessary for effective least privilege implementation. This often results in either overprivileged accounts or hindered user functionality.
Cloud Proliferation and Multi-Cloud Challenges: The ephemeral nature of cloud environments complicates tracking and managing permissions. Users often expect cloud services to have built-in security measures, which may not be sufficient for strict PoLP enforcement.
Visibility and Control Over Privileged Accounts: A significant barrier to effective least privilege enforcement is the lack of visibility into all privileged accounts and credentials. Without comprehensive monitoring and management, privileged accounts can become a major security risk.
Case Studies and Real-World Examples
SolarWinds Breach: Attackers exploited excessive privileges granted to the Orion application, which required global administrator access to function. This breach underscores the dangers of not adhering to the least privilege principle in application management.
Verkada Breach: Compromised super admin credentials allowed attackers to access the live feeds of 150,000 security cameras. This incident highlights the risks associated with overprivileged accounts and the lack of proper access controls.
NSA / Edward Snowden Breach: Snowden used his administrative privileges to access and leak significant amounts of classified information, demonstrating how excessive privileges can lead to massive data breaches.
Target Breach: Hackers used credentials from a third-party vendor to access Target’s network, showing how third-party access can lead to significant breaches if not properly managed under the least privilege principle.
These examples illustrate the critical need for stringent control and regular audits of access privileges to prevent security breaches and ensure compliance with least privilege policies.
Benefits of Automating Least Privilege Access
Automating the enforcement of least privilege access yields significant benefits for organizations, chiefly in terms of security enhancements and operational efficiencies. By implementing systems that automate the provisioning and revocation of access, companies can better manage user permissions, ensuring that access is strictly aligned with job requirements. This minimization of excessive privileges not only reduces the attack surface but also limits the potential impact of security incidents.
Enhanced Security Outcomes
The principle of least privilege is fundamental in maintaining a secure IT environment. Automation plays a pivotal role in enforcing this principle effectively across an organization’s network. By automating access controls and permissions, the risk of unauthorized access is significantly diminished. This is crucial for preventing data breaches and ensuring that sensitive information remains protected. Automated systems can quickly adjust permissions in real-time, based on predefined policies that assess the current needs and threat landscape, thereby enhancing the overall security posture.
Automated least privilege systems prevent malware spread by restricting user access to execute potentially harmful applications. This containment is critical in mitigating the impact of cyber threats, as it limits the blast radius of any attack. For instance, if a user inadvertently triggers malware, the damage remains confined to the limited access available to that user’s account, rather than permeating throughout the network.
Moreover, the application of least privilege through automation supports compliance with various regulatory requirements. By providing detailed logs and records of access activities, organizations can demonstrate compliance during audits more effectively, showcasing their commitment to stringent security practices.
Operational Efficiency and Cost Savings
One of the most tangible benefits of automating least privilege access is the enhancement of operational efficiency. Manual management of access rights is not only time-consuming but also prone to errors, which can lead to both security vulnerabilities and operational bottlenecks. Automation alleviates the administrative burden on IT staff, freeing up their time to focus on more strategic tasks that add value to the business.
Furthermore, the implementation of just-in-time (JIT) access models ensures that permissions are granted precisely when needed and revoked immediately after use. This approach not only tightens security but also optimizes resource usage, preventing unnecessary access that could otherwise tie up valuable IT assets.
In conclusion, automating least privilege access is a strategic move that offers multiple advantages. It strengthens security measures, supports compliance efforts, and enhances operational efficiency, all of which are crucial for modern organizations facing a complex cybersecurity landscape.
Implementing Automated Least Privilege Access
Implementing automated least privilege access involves a series of strategic steps and the adoption of specific tools to ensure that access rights are strictly aligned with the operational needs of an organization. This approach not only enhances security but also improves operational efficiency and compliance.
Implementing automated least privilege access involves a series of strategic steps.
Strategies and Best Practices
To effectively implement automated least privilege access, organizations should consider the following strategies:
Self-Service Access Empowering employees through self-service portals allows them to request access as needed without excessive administrative delay. This reduces the broader permissions often requested out of convenience and aligns access more closely with immediate job requirements.
Decentralized Resource Ownership By decentralizing the approval process, access requests can be evaluated and approved by direct managers or resource owners who understand the specific needs of their operations. This approach reduces the burden on IT departments and speeds up the access management process.
Policy-Based Access Implementing policy-based access control systems where access rights are automatically determined based on predefined policies ensures that decisions about access are consistent, timely, and aligned with organizational security policies. This method leverages attributes such as role, department, and data sensitivity.
Automatic Access Provisioning Utilizing API-driven tools for access provisioning allows organizations to automate the granting and revocation of access rights. This not only ensures a rapid response to access requests but also the immediate withdrawal of access once it is no longer needed, thereby adhering strictly to the principle of least privilege.
These strategies should be supported by continuous monitoring and adjustment to address the evolving needs and security landscape of the organization.
Tools and Software Recommendations
For the successful implementation of automated least privilege access, the following tools and software are highly recommended:
Identity and Access Management (IAM) Solutions: Tools such as Okta or Microsoft Azure Active Directory provide robust frameworks for managing identities and access rights across various resources.
Privileged Access Management (PAM) Software: Solutions like CyberArk, Apono or Thycotic Secret Server help manage and monitor privileged accounts, which are often the target of cyber attacks.
Access Rights Management (ARM) Tools: Systems like Apono or SolarWinds Access Rights Manager can automate the detection and management of user permissions, ensuring that only necessary privileges are granted.
Workflow Automation Platforms: Tools like ServiceNow or custom solutions developed with no-code platforms can automate the workflows associated with access requests, approvals, and provisioning.
By integrating these tools into their security infrastructure, organizations can significantly enhance their ability to manage access rights efficiently and securely, minimizing the risk associated with over-privileged accounts and ensuring compliance with relevant regulations.
Conclusion
Through the comprehensive exploration of the principle of least privilege and the pivotal role of automation in its enforcement, it becomes abundantly clear that leveraging technological solutions is not only beneficial but essential for modern organizations aiming to secure their digital landscapes. Automation enhances compliance, refines access control, and simplifies the management of privileges, thereby effectively diminishing the risk of security breaches. This shift towards automated systems underscores a move from manual, error-prone processes to more resilient, efficient, and secure operations, significantly fortifying an organization’s defense against cyber threats.
Snowflake Breach Attack Insights
The recent attack on Snowflake accounts underscores a critical lesson for all cloud users: securely managing identities and access is paramount under the shared responsibility model. As more organizations leverage cloud services, it’s essential to understand that security is a collaborative effort between the service provider and the customer.
Here are some key takeaways: 1️⃣ Shared Responsibility Model: While cloud providers like Snowflake ensure the security of the infrastructure, customers must secure their identities and access management. 2️⃣ Identity Management: Implement strong identity governance to ensure only the right people have the appropriate access to critical data. 3️⃣ Access Control: Use tools and policies to manage and monitor access, reducing the risk of unauthorized access.
Listen in to hear our Director of Product, Sharon Kisluk, explain where things went wrong in this major security incident.
Transcription below
At first people thought it was a breach of Snowflake, but then it turned out that the hacks happened because these companies had credentials that were stale with open-ended access to the data that were found online.
20:54 Okay, so also you have to include in this the fact that there was only a single factor off of the kinds of which were targeted, which is its own question about whether or not Snowflake needs to start implementing MFA requirements for sensitive data being stored there.
21:08 But we see data hacks happen all the time. Why was this interesting?
11:13 Yeah, I think this was interesting, first of all, because of the scale. We’re talking about very big companies and really sensitive data. That’s the stuff you don’t want to have leaked, right? Your customer data, personal information.
11:25 But also, I think what’s interesting is that, first of all, the vendor did everything right. Snowflake itself was not hacked. It offered its services as expected. And it really goes to show that companies, customers, need to think about identity and access management.
11:38 They need to understand that they have shared responsibility with the vendor to secure their identities and their data. And we see here a complete failure of identity and access management processes. Credentials were not rotated. Accounts that were not used were not properly off-boarded. And access was left open-ended to something very, very sensitive instead of being managed
11:57 just in time as people require it. So that’s a big thing. And also, to add to that point of how important identity security is, there was no vulnerability of resources involved. So no cloud resources, no services,
12:16 storage, databases, buckets, nothing was misconfigured or had vulnerability. So that just adds to the fact that identities was the cause of the breach here.
22:25 Right, so it’s very much a human management problem more so than anything
Healthcare Cybersecurity: Preventing Data Breaches
Healthcare organizations find themselves today at the forefront of a disturbing trend: a seemingly unending onslaught of data breaches. These nefarious incidents, far from being isolated occurrences, have emerged as a persistent and pervasive threat, one that demands immediate and comprehensive action to safeguard patient privacy and operational integrity.
Understanding the Magnitude of Healthcare Data Breaches
The unique sensitivity and value of protected health information (PHI) make it a prime target for identity theft, phishing attacks, and ransomware attacks, thereby underscoring the magnitude of prioritizing data security within the healthcare sector. Ensuring robust cybersecurity measures are not just about compliance; it’s about protecting individuals’ most intimate data from cybercriminals who are continuously evolving in their methods of attack.
Statistics and Trends
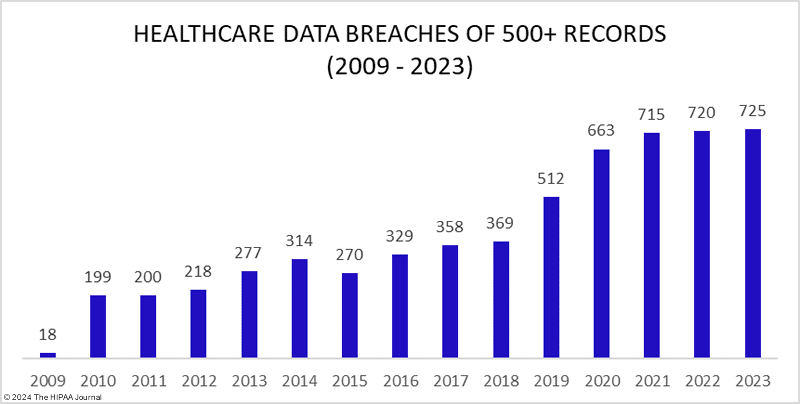
The healthcare industry faces an escalating threat from cyberattacks, with the volume and severity of data breaches reaching unprecedented levels. In 2023 alone, the Department of Health and Human Services (HHS) Office for Civil Rights (OCR) reported a record-setting 725 large security breaches, surpassing the previous year’s total.
This trend marks a significant increase from just a few years ago, where the reporting rate was approximately one large data breach per day. Now, it stands at two per day, highlighting the growing frequency and sophistication of attacks targeting the sector.
The magnitude of these breaches is equally alarming. The year 2023 set a new high for the number of breached healthcare records, totaling over 133 million. This represents a 156% increase from the previous year, demonstrating not only the frequency but also the scale of these incidents. Among these, there were 114 breaches involving more than 100,000 records, including 26 breaches affecting over 1 million records, and one particularly devastating breach impacting 11.27 million records.
High-profile Cases
The healthcare sector has witnessed several high-profile data breaches, underscoring the critical vulnerabilities within its cybersecurity frameworks. For instance, HealthEC, a New Jersey-based analytics software vendor, experienced a breach through which hackers accessed a system used by over 1 million healthcare professionals. This breach compromised the protected health information of approximately 4.45 million individuals.
Another significant breach occurred at ESO Solutions, a provider of software solutions for emergency medical services, which suffered a network breach leading to file encryption by ransomware. This incident affected at least 12 health systems and hospitals, impacting the data security of numerous patients.
Moreover, the Clop hacking group exploited a zero-day vulnerability in Progress Software’s MOVEit Transfer solution, affecting more than 2,600 organizations globally, with the healthcare industry being one of the most impacted. This breach highlights the increasing sophistication of cyberattacks and the challenges in protecting healthcare data against such threats.
These examples illustrate not only the scale but also the severity of data breaches in the healthcare sector, emphasizing the urgent need for enhanced cybersecurity measures to protect sensitive patient information and maintain trust in healthcare services.
Common Causes of Data Breaches in Healthcare
The healthcare industry, while advancing in digital capabilities, faces significant vulnerabilities that attract cybercriminals. The common causes of data breaches in this sector can be broadly categorized into system vulnerabilities, human error, and cyber attacks. Each category presents unique challenges and requires targeted strategies to mitigate risks effectively.
System Vulnerabilities
Healthcare systems often rely on a complex network of technologies including outdated legacy systems, third-party vendors, and an increasing array of Internet of Medical Things (IoMT) devices. These systems frequently suffer from security vulnerabilities due to insufficient updates and patches. For example, outdated systems may no longer receive manufacturer support, leaving them susceptible to new threats. Additionally, the extensive use of third-party services increases risk exposure, as these vendors may not always employ stringent cybersecurity measures. A staggering number of healthcare organizations store sensitive data in the cloud without adequate security, making them prime targets for breaches.
Human Error
Human error remains one of the largest contributors to data breaches within healthcare. This includes errors by employees, contractors, and vendors who may inadvertently expose the network to cyber threats. Common mistakes include the misuse of credentials, falling for phishing scams, and inadequate training on cybersecurity best practices. For instance, the use of weak or default passwords can allow easy access for cybercriminals. Studies have shown that a significant portion of breaches results from general carelessness and a failure to adhere to security protocols, underscoring the need for comprehensive and continuous training.
Cyber Attacks
Cybercriminals are increasingly sophisticated in their methods to exploit healthcare systems. Ransomware attacks, phishing, and advanced malware are common tools used to breach healthcare data. The healthcare sector’s high-value data makes it a lucrative target for attackers looking to sell stolen information on the dark web or use it for further criminal activities. Recent reports indicate a sharp increase in the number of attacks, particularly through ransomware, highlighting an urgent need for healthcare facilities to strengthen their cybersecurity defenses.
These vulnerabilities not only compromise patient privacy but also disrupt healthcare operations, leading to significant financial and reputational damage. Addressing these issues requires a robust cybersecurity framework and a proactive approach to safeguarding patient data against the evolving landscape of cyber threats.
Impact of Data Breaches on Healthcare Organizations
Financial Costs
Data breaches in healthcare organizations lead to significant financial burdens, with the average cost of a healthcare data breach reaching approximately $10.93 million. This staggering figure encompasses a variety of financial impacts, including the immediate costs of responding to the breach, legal fees, HIPAA violation fines, and increased insurance premiums. Additionally, healthcare organizations face potential lawsuits and a loss of revenue as patients move to other providers due to diminished trust. The cost per lost or stolen record is notably higher in healthcare, averaging around $499, which is significantly above the average across other industries.
Reputational Damage
The reputational impact of a data breach can be profound and long-lasting for healthcare organizations. Data breaches not only damage the public image of healthcare providers but also deter potential staff and associates who might be concerned about their professional reputation and the security of their own data. The erosion of patient confidence is particularly detrimental; it is built over years of interactions and once lost, can be challenging to regain. This loss of trust can lead patients to seek care elsewhere, further affecting the healthcare organization’s standing in the community and its operational viability.
Patient Privacy Concerns
Breaches compromise the privacy and security of patients’ personal, medical, and financial information, leading to identity theft and other forms of cybercrime. The sensitive nature of health records makes them a prime target for attackers, and once this information is compromised, it can lead to serious consequences for patients. For instance, unauthorized changes to a patient’s medical history or prescriptions can result in improper treatment, posing significant health risks. Furthermore, the psychological impact, including stress and anxiety about personal data security, can deter patients from sharing essential health information with their providers, compromising future medical care. The legal and financial repercussions for healthcare providers in such instances are severe, underscoring the need for robust security measures and effective breach-response strategies.
Preventive Measures for Healthcare Data Security
Robust Cybersecurity Infrastructure
To safeguard sensitive health information effectively, healthcare organizations must establish a robust cybersecurity infrastructure. This involves implementing strong encryption protocols for data at rest and in transit, ensuring that even if data is intercepted, it remains secure and unreadable. Additionally, robust access controls are crucial. Adopting the principle of least privilege ensures that employees have access only to the data necessary for their roles, thereby minimizing the risk of insider threats and reducing the potential for unauthorized data access. Regular updates and reviews of access controls are essential to adapt to changes in staff roles and responsibilities.
Regular Audits and Risk Assessments
Conducting regular security audits and cybersecurity maturity assessments (CSMAs) is vital for identifying and addressing vulnerabilities within healthcare systems. These audits, carried out by internal or external experts, help ensure that security measures are up-to-date and effective. For organizations facing financial and logistical constraints, prioritizing audits of the most critical systems offers a manageable approach. Regular risk assessments are also crucial as they help healthcare organizations identify potential risks to patient safety, data privacy, and regulatory compliance, thereby enabling them to prioritize resources and implement appropriate mitigation strategies.
Staff Training and Awareness
The human element plays a significant role in cybersecurity. Providing comprehensive security awareness training (SAT) helps change employee behavior and strengthens the overall security posture of the organization. Training should include topics such as recognizing phishing attempts, the importance of strong password practices, and the proper handling of patient data. Regular, focused training sessions enhance staff awareness and preparedness against cyber threats. Additionally, including simulated phishing emails and reviewing actual scenarios of healthcare breaches in training sessions can be particularly effective in educating staff about cybersecurity best practices.
Implementing these preventive measures is essential for healthcare organizations to protect against data breaches and cyberattacks, ensuring the security and privacy of patient information.
Conclusion
Throughout the discourse on healthcare cybersecurity, we’ve underscored the paramount importance of establishing and maintaining rigorous security protocols to protect sensitive patient information against an ever-evolving array of cyber threats. From understanding the vast repercussions of data breaches on patient trust and financial stability, to dissecting the multifaceted causes—be it system vulnerabilities, human error, or direct cyber attacks—the need for a holistic approach to cybersecurity within healthcare is crystal clear. Implementing comprehensive measures such as beefed-up security infrastructures, regular risk assessments, and continuous staff training, encapsulates our discussion’s core message: the safeguarding of patient data is not merely a regulatory compliance issue but a foundational component of healthcare’s integrity and trustworthiness.
As we navigate through the complex digital landscape of modern healthcare, the broader implications of our findings compel a shift towards more resilient, proactive cybersecurity strategies. The exponential rise in cyberattacks highlights an urgent need for the healthcare sector to adopt and adapt to enhanced protective measures, lest the ramifications of breaches become increasingly catastrophic. The call to action for healthcare providers is unequivocal—bolster your cybersecurity defenses, thereby ensuring not only the protection of patient data but also securing the foundation upon which patient-provider relationships stand. Reflecting upon these discussions, it’s evident that prioritizing cybersecurity is not optional; it is imperative for the continued viability and trust in healthcare services.
How Apono Helps
Apono aids companies in the healthcare industry in preventing data breaches by implementing advanced security protocols and compliance measures tailored to the sector’s unique needs. Apono ensures that sensitive patient information remains secure. Additionally, the platform offers comprehensive access control systems, allowing organizations to manage user permissions effectively. By adhering to industry standards such as HIPAA, Apono not only protects data but also helps healthcare providers avoid costly fines and reputational damage associated with breaches. This multi-layered approach fortifies the integrity and confidentiality of healthcare data, fostering trust and reliability.
8 Steps to Get Value from Azure Identity Protection
Today’s digital landscape is full of ever-evolving cyber threats. Securing your organization’s identities has become very important. Azure Identity Protection is a strong ally. It empowers you to strengthen your defenses and protect your most valuable assets: your users’ identities. This strong security service gives you a single view of potential weaknesses. It also gives you the tools to stop risks and react fast to incidents.
Unveiling the Essence of Azure Identity Protection
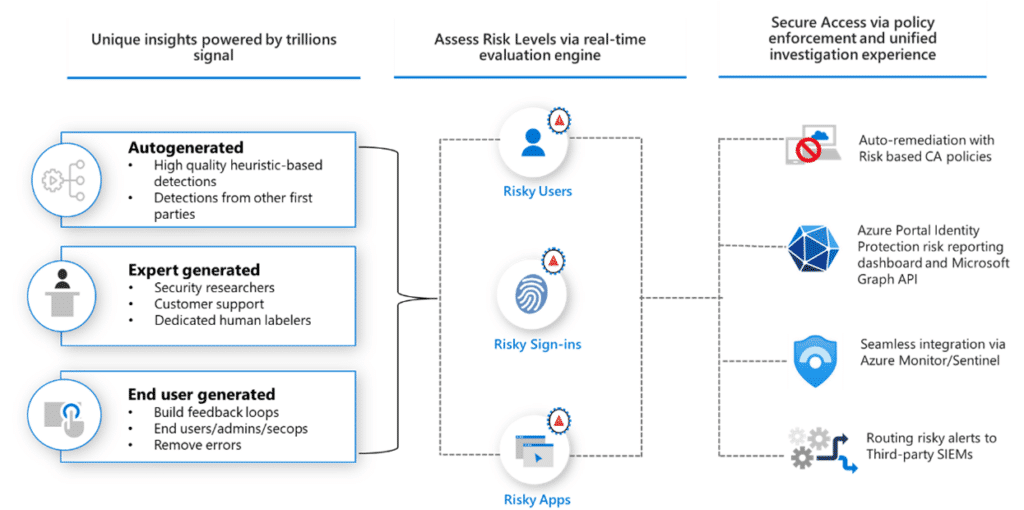
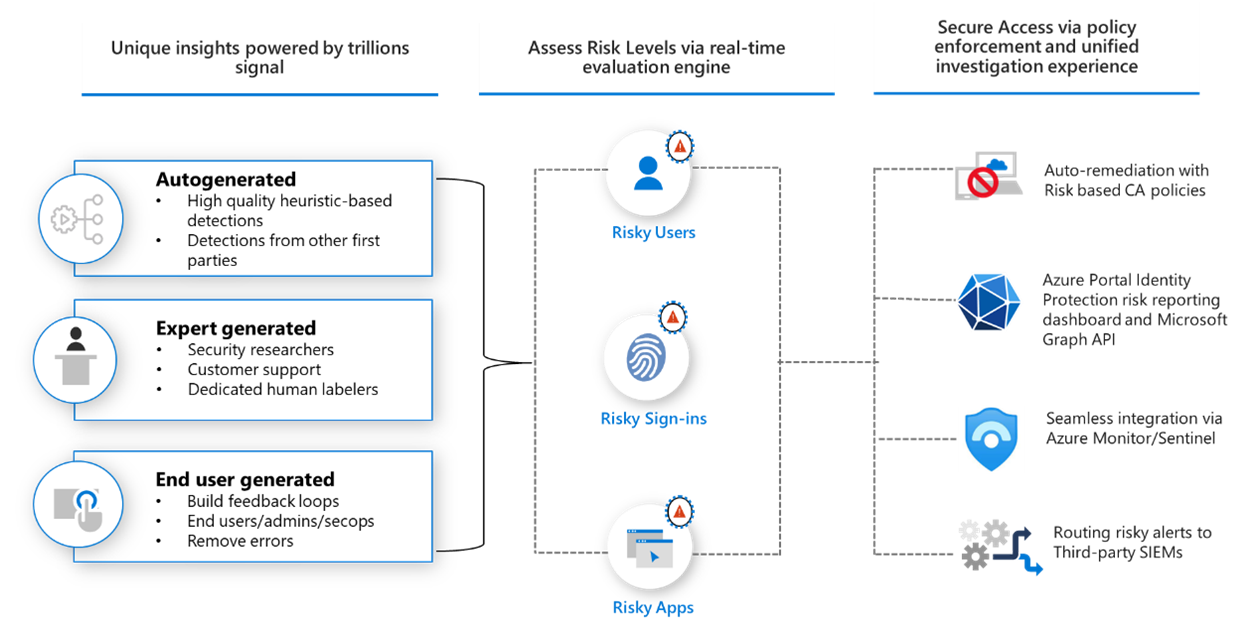
Azure Identity Protection is an intelligent security solution that leverages adaptive machine-learning algorithms to detect anomalies and suspicious activities associated with user identities. By continuously monitoring and analyzing user behavior patterns, sign-in locations, device health, and other contextual factors, it can identify potential threats such as leaked credentials, compromised accounts, and impossible travel scenarios.
The service generates comprehensive reports and alerts, enabling administrators to investigate and respond promptly to potential vulnerabilities. Moreover, Azure Identity Protection offers powerful remediation capabilities, including enforcing multi-factor authentication (MFA) and facilitating secure password resets, ensuring that issues are swiftly resolved and risks are mitigated.
Reaping the Benefits
Implementing Azure Identity Protection within your organization yields numerous advantages, fortifying your security posture while streamlining operational processes:
Proactive Threat Detection. By harnessing the power of machine learning, Azure Identity Protection can identify potential threats before they escalate, enabling you to take preemptive measures and minimize the impact of security incidents.
Reduced Account Takeover Risks. With its ability to detect compromised accounts and risky sign-in attempts, Azure Identity Protection significantly reduces the risk of account takeovers, safeguarding your organization’s sensitive data and resources.
Rapid Incident Response. By providing detailed insights into risky users and sign-in activities, Azure Identity Protection empowers your security teams to investigate and respond to incidents promptly, minimizing potential damage and ensuring business continuity.
Enforced Multi-Factor Authentication. Azure Identity Protection allows you to implement risk-based conditional access policies, automatically enforcing MFA for high-risk scenarios, adding an extra layer of security to your authentication processes.
Streamlined Identity and Access Management (IAM). With its integration into the Azure Active Directory (Azure AD) ecosystem, Azure Identity Protection seamlessly aligns with your existing IAM policies and procedures, ensuring a cohesive and efficient security strategy.
Improved Visibility and Reporting. The comprehensive reporting capabilities of Azure Identity Protection provide you with detailed insights into your organization’s identity-related risks, enabling data-driven decision-making and facilitating compliance with industry regulations.
Maximizing the Value in 8 Steps: Best Practices for Azure Identity Protection
To fully harness the potential of Azure Identity Protection and ensure its effective implementation within your organization, adhering to industry-recognized best practices is crucial. By following these guidelines, you can optimize your security posture, minimize risks, and maximize the return on your investment.
1. Engage Stakeholders Early and Effectively
Securing buy-in and aligning expectations with internal stakeholders, such as IT security teams, infrastructure/operations teams, application owners, and business leaders, is essential for smooth adoption and optimal utilization of Azure Identity Protection. By engaging stakeholders early in the process, you can ensure a shared understanding of the solution’s capabilities, define roles and responsibilities, and gather valuable insights tailored to your organization’s unique needs.
To achieve this, consider the following steps:
Identify all stakeholders impacted by Azure Identity Protection, including security administrators, IT teams managing authentication systems, application owners, helpdesk personnel, and end-users.
Conduct workshops and demonstrations to showcase Azure Identity Protection’s capabilities, such as risk modeling, automated response mechanisms, and reporting features.
Define clear roles and responsibilities for each stakeholder group in deploying, supporting, and extracting value from the solution.
Gather input from stakeholders regarding desired policies, alert configurations, and integrations with other tools like Security Information and Event Management (SIEM) solutions.
Establish an onboarding plan for end-users impacted by MFA registration and risk-based policies, ensuring a smooth transition and minimizing disruptions.
Implement a support and escalation process to address issues faced by users during the adoption phase.
Foster a feedback loop for continuous improvement, allowing stakeholders to provide insights and suggestions for optimizing the solution’s implementation post-rollout.
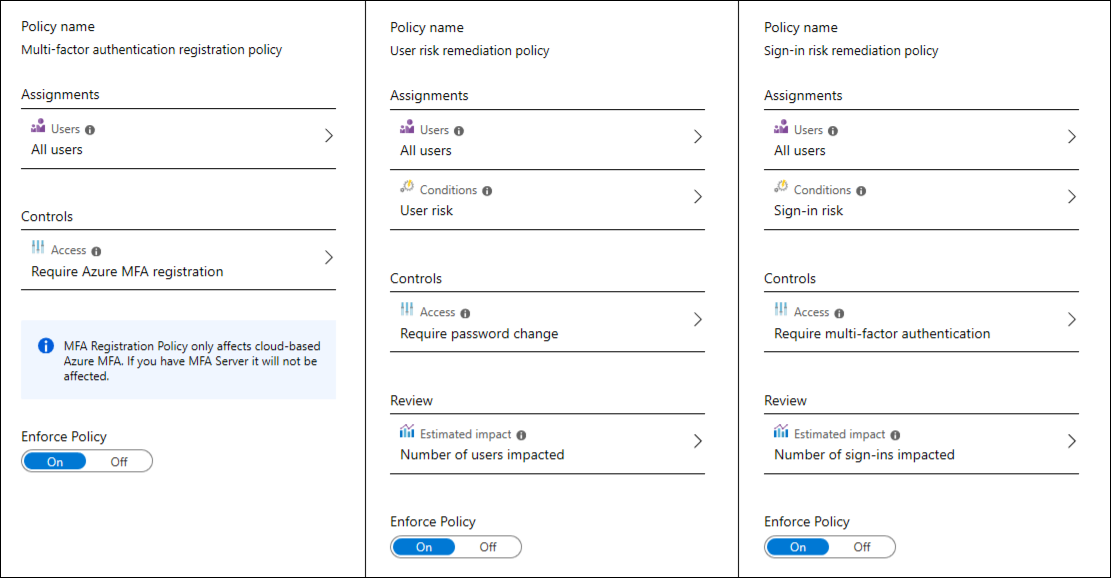
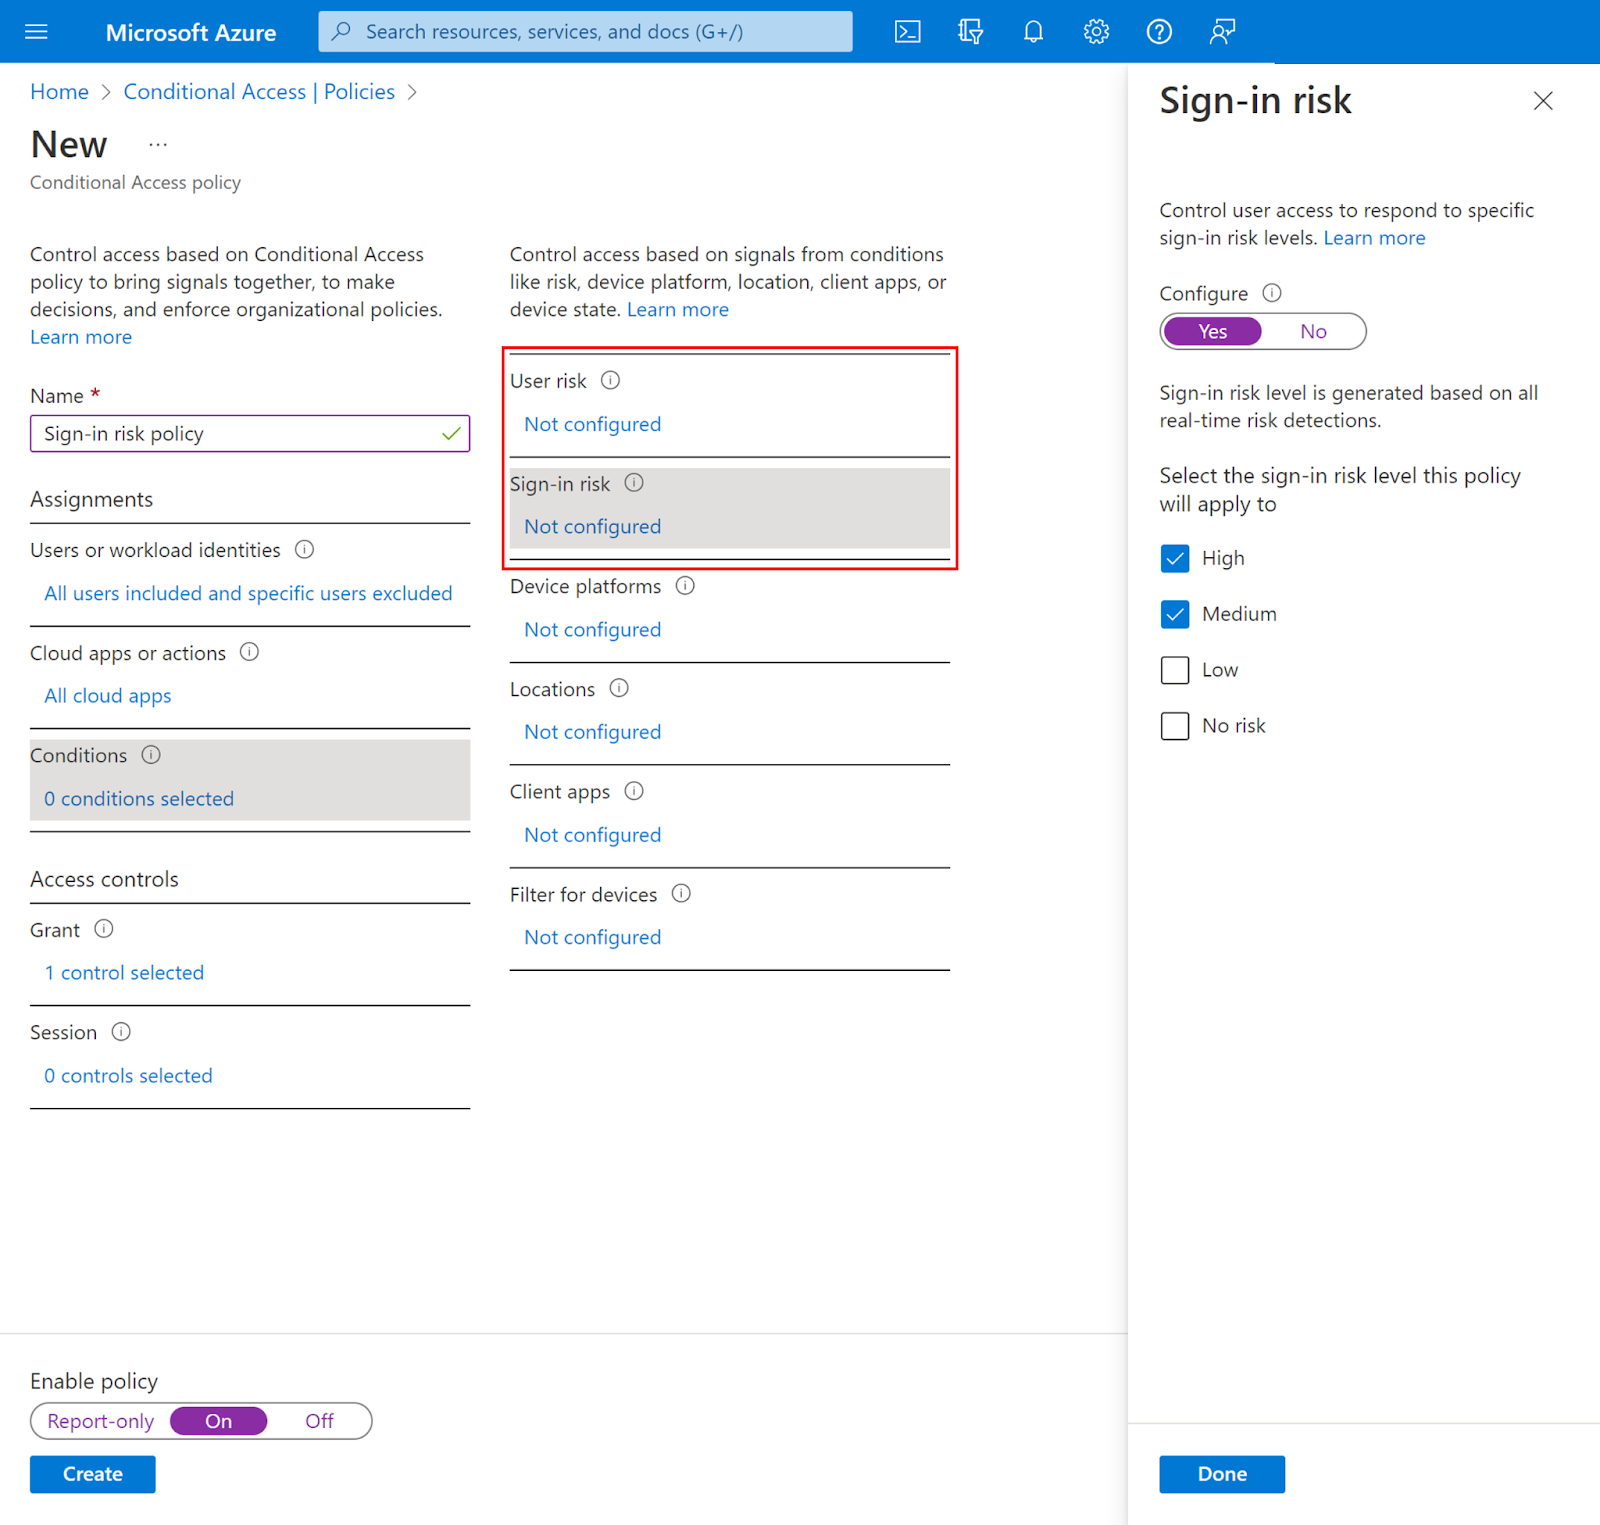
2. Configure Risk Policies with Precision
Azure Identity Protection empowers you to create Conditional Access policies that automatically respond to user and sign-in risks detected through its AI-driven risk modeling. Properly configured risk policies act as automated sentinels, promptly responding to abnormal activities before incidents occur, thereby minimizing potential threats and ensuring business continuity.
To optimize your risk policies, consider the following recommendations:
Enable the user risk policy to enforce actions such as MFA or password changes for users identified as high-risk.
Implement the sign-in risk policy to trigger MFA prompts or block access for risky sign-in attempts.
Set appropriate thresholds for user and sign-in risks based on your organization’s security posture and risk tolerance. More aggressive thresholds may lead to an increased number of false positives.
Scope policies to cover all users or specific critical groups, such as administrators, based on your desired level of coverage.
Exclude emergency access accounts from risk policies to prevent accidental lockouts and maintain administrative access in critical scenarios.
Leverage the report-only mode to evaluate the potential impact of your policies before full enforcement, allowing you to make informed adjustments.
Regularly review automated remediations in usage reports to correlate risk detections with user and sign-in actions taken, ensuring the effectiveness of your policies.
Periodically adjust policies based on an analysis of risk patterns within your environment, ensuring they remain aligned with evolving threats and organizational needs.
Export risk detections to your SIEM solution for further correlation and enhanced monitoring coverage.
Conduct thorough testing to strike a balance between robust security measures and a seamless user experience.
The Azure Identity Protection policy for MFA registration prompts users to enroll in Azure AD Multi-Factor Authentication (MFA) during sign-in, strengthening account security beyond relying solely on passwords. By enforcing MFA registration, you can significantly reduce the risk of unauthorized access and account compromises, enhancing the overall security posture of your organization.
To effectively implement MFA registration, consider the following best practices:
Enable policies for cloud services, applications, and systems, and enforce registration for all users. Alternatively, you can opt for a gradual rollout to minimize disruptions and ensure a smooth transition.
Educate users on the importance of MFA and how it safeguards their accounts from unauthorized access, fostering a security-conscious culture within your organization.
Provide clear instructions and guidance to users on enrolling their devices for MFA, ensuring a seamless registration process.
For mobile devices, ensure users have downloaded and activated the Microsoft Authenticator app, enabling them to leverage its secure authentication capabilities.
For desktops and laptops, guide users to enable phone-based MFA or FIDO2 security keys as their secondary authentication factor.
Encourage users to register multiple verification methods as backups, ensuring uninterrupted access in case one method becomes unavailable.
Prioritize MFA registration for privileged accounts, such as administrators, to protect critical access and minimize the risk of unauthorized administrative actions.
Consider excluding break-glass accounts from MFA enforcement to prevent inadvertent lockouts and maintain emergency administrative access.
Utilize the report-only mode initially to gauge the potential impact of MFA registration before enforcing it across your organization.
Evaluate if existing MFA solutions need to be phased out after the successful rollout of Azure AD MFA, consolidating your authentication mechanisms for improved efficiency and management.
Monitor registration status and follow up with users who fail to complete the registration process after receiving prompts, ensuring organization-wide compliance.
4. Establish Emergency Access Procedures
When configuring Azure Identity Protection risk policies for user and sign-in risks, excluding emergency access or break-glass administrator accounts from the scope is crucial. This precautionary measure ensures that you maintain administrative access to Azure AD in worst-case scenarios, such as mass user lockouts due to policy misconfiguration or synchronization errors.
To establish a robust emergency access procedure, consider the following steps:
Create at least two emergency access accounts within your Azure AD tenant, ensuring they are granted global administrator privileges.
Explicitly exclude these accounts from Conditional Access policies enforcing MFA, password resets, or other risk-based actions for risky users or sign-ins.
Implement a documented process for securing and managing these emergency accounts, including:
Ensuring that the account credentials are known only to designated individuals, such as Chief Information Security Officers (CISOs) or security leads.
Rotating the credentials periodically, ideally every 30 to 90 days, to mitigate the risk of unauthorized access.
Monitoring the accounts for any anomalous sign-in or usage patterns that may indicate potential compromise.
Outlining a verification process to be followed before utilizing these accounts, ensuring proper authorization and minimizing the risk of misuse.
5. Optimize Risk Modeling with Trusted Locations
Configuring named locations for office networks and Virtual Private Network (VPN) ranges is an essential optimization for Azure Identity Protection’s risk modeling. By declaring internal networks as trusted or known locations, sign-ins originating from these sources will be assigned lower risk scores within Identity Protection. This approach minimizes false positives and unnecessary challenges for users accessing resources from within the corporate network, enhancing the overall user experience while maintaining a robust security posture.
To optimize risk modeling with trusted locations, consider the following steps:
Create named locations in Azure AD Conditional Access, representing your organization’s office IP ranges and VPN connections.
Mark on-premises office networks as ‘trusted locations’ once configured, ensuring that sign-ins from these locations are treated as low-risk.
Configure VPN IP ranges as named locations and designate them as ‘known,’ further refining the risk assessment process.
Promptly update location definitions if your office networks or VPN configurations change, ensuring that risk modeling remains accurate and up-to-date.
Verify location mappings by reviewing sign-in logs to ensure that IP addresses are correctly matching the defined trusted and known locations.
Exclude unnamed or unknown locations from the trusted or known designations, ensuring that sign-ins from these sources are subject to heightened scrutiny.
Periodically review sign-in logs to validate the accuracy of your location mappings, making adjustments as necessary to maintain optimal risk modeling.
6. Enable Comprehensive Security Monitoring
Ongoing monitoring and alerting are critical components of an effective risk management strategy. By enabling robust monitoring and integrating Azure Identity Protection with your existing security infrastructure, you can ensure that risk visibility and response coordination become a 24/7 capability, maximizing the value derived from the solution.
To achieve comprehensive security monitoring, consider the following recommendations:
Configure email notifications for new risky users, risky sign-ins, and weekly digest reports, ensuring that appropriate security team members are promptly alerted.
Establish a routine for regularly reviewing Azure Identity Protection reports, such as risky users, risky sign-ins, and risk detections, enabling proactive identification and mitigation of potential threats.
Create Azure Monitor dashboards to visualize risk trends, policy actions taken, and track the status of remediation efforts, providing a centralized view of your organization’s security posture.
Leverage the Azure Identity Protection workbook template to gain deeper insights through interactive reports, enabling data-driven decision-making and enhanced situational awareness.
Export Azure Identity Protection events via the Graph Security API to your SIEM solution, enabling correlation with other security-related events for a holistic view of potential threats.
Within your SIEM solution, correlate risk detections from Azure Identity Protection with other identity-related security events, enhancing monitoring coverage and enabling more comprehensive threat detection.
Configure automated response workflows or playbooks in solutions like Azure Sentinel, triggering predefined actions based on Azure Identity Protection alerts, streamlining incident response processes.
Document investigation and remediation processes for security operations teams, ensuring consistent and efficient handling of security incidents.
7. Foster a Security-Conscious Culture through End-User Training
An educated and security-conscious user base is less prone to lapses that can jeopardize account security. Continuous training and engagement initiatives help sustain user cooperation, which is crucial for the successful adoption and ongoing effectiveness of Azure Identity Protection.
To cultivate a security-conscious culture within your organization, consider the following best practices:
Inform users about new Azure Identity Protection policies, such as MFA registration and risk-based sign-in challenges, explaining the rationale and benefits behind these measures.
Provide clear instructions and guidance on enrolling for MFA during sign-in prompts, ensuring a smooth user experience and minimizing potential frustrations.
Train users on proper password hygiene practices, including the use of strong passwords, password managers, and the importance of avoiding password reuse across multiple sites or services.
Implement self-service password reset (SSPR) capabilities for user accounts, empowering users to maintain control over their account security while reducing the administrative burden on IT teams.
Raise awareness about phishing attacks and social engineering tactics, equipping users with the knowledge to identify suspicious emails, links, or other potential threats.
Encourage users to report any suspicious activity, such as unfamiliar sign-in locations or unauthorized access attempts, fostering a collaborative approach to security.
Incentivize and reward security-conscious behavior among employees, driving engagement and reinforcing the importance of cybersecurity best practices.
Track training completion rates and measure security awareness over time through simulated phishing campaigns or red teaming exercises, identifying areas for improvement and tailoring future training initiatives accordingly.
8. Leverage Third-Party Solutions
By leveraging the combined power of Azure Identity Protection and advanced solutions like Apono, organizations can establish a comprehensive, identity-centric security strategy that proactively identifies vulnerabilities, mitigates risks, and ensures the protection of their most valuable assets–their identities.
Conclusion
In the ever-evolving cybersecurity landscape, securing your organization’s identities is a critical imperative. Azure Identity Protection emerges as a powerful ally, offering intelligent capabilities to identify vulnerabilities, remediate risks, and enforce access controls. By following the best practices outlined in this comprehensive guide, you can unlock the full potential of Azure Identity Protection, fortifying your defenses and safeguarding your users’ identities from malicious actors.
Remember, a robust security strategy is not a one-time endeavor; it requires continuous vigilance, adaptation, and a commitment to staying ahead of emerging threats. By leveraging solutions like Azure Identity Protection and complementing them with advanced identity threat protection platforms, you can establish a comprehensive, identity-centric security posture that empowers your organization to thrive in the digital age.
Apono and Azure Identity Protection
At its core, Azure Identity Protection leverages machine learning and advanced analytics to detect suspicious activities and potential security threats in real-time. Now, add Apono to the mix, and you’ve got a dynamic duo that ensures your identity management system is not just reactive but proactively securing your digital landscape. Apono enhances Azure’s already powerful suite by offering seamless access governance and compliance tracking, making sure that only the right people have access to the right resources at the right time.
It starts with Apono’s ability to automate access requests and approvals through Azure’s identity management framework. This automation drastically reduces the manual effort needed to manage user permissions, ensuring that your IT team can focus on strategic initiatives rather than getting bogged down in administrative tasks. The synergy between Apono and Azure Identity Protection means that any anomalies or risks identified by Azure are swiftly acted upon by Apono’s intelligent system, which can automatically revoke or adjust access permissions as needed.
Another aspect of this integration is the enhanced user experience. By leveraging Azure’s Single Sign-On (SSO) capabilities, Apono ensures that users have quick and secure access to the applications they need without juggling multiple credentials. This not only boosts productivity but also reduces the risk of password-related security breaches. Furthermore, with Apono’s self-service portal, users can request access or report issues directly, streamlining processes and reducing the workload on IT support teams.
In summary, the collaboration between Apono and Azure Identity Protection creates a formidable defense against cyber threats while optimizing identity management processes. This integration brings together automation, real-time threat detection, comprehensive reporting, and an enhanced user experience to deliver unparalleled security and efficiency. So, if you’re looking to take your organization’s identity protection to the next level, integrating Apono with Azure Identity Protection is undoubtedly the way to go.
Mastering the Art of Least Privilege Access Implementation: A Comprehensive Guide
The concept of least privilege access has emerged as a paramount principle, serving as a cornerstone for robust identity governance and access management strategies. By adhering to this tenet, organizations can effectively mitigate the risks associated with account compromises, insider threats, and unauthorized access to sensitive resources. However, achieving least privilege access across intricate, sprawling identity environments is no simple feat, often presenting substantial challenges that demand meticulous planning and execution.
Understanding the Principle of Least Privilege Access
The principle of least privilege access, a fundamental element of zero trust security, is predicated on the notion of granting individuals access solely when they require it to fulfill their job responsibilities and for no longer than necessary. By enforcing this principle, organizations can significantly reduce the likelihood of account compromises and minimize the potential impact of a compromised account or insider threat.
Why is it Important?
According to a recent report from the Identity Defined Security Alliance (IDSA), 22% of businesses see managing and securing digital identities as the number one priority of their security program, up from 17% in 2023. More than half of respondents (51%) said they now see it as a top three priority, and another 18% see security digital identity as a top five priority. Only 2% of businesses don’t see securing identities as a top 10 priority. This trend of increasing priority is a positive sign of the recognition of the importance of identity.
“Identity-related incidents are on the rise, emphasizing the need for strong identity security measures,” IDSA executive director Jeff Reich said in a news release. “Many of today’s major breaches result from sophisticated phishing and social engineering attacks or not having multi-factor authentication. These incidents not only impact operations, they cost a fortune—UnitedHealth experienced a $872 million loss from the Change Healthcare cyberattack,” Reich continued. “And they can also lead to significant drops in stock prices and lasting reputational damage. With identity threats becoming more severe, it’s crucial for organizations to strengthen their identity security frameworks to better protect against these growing challenges.”
IDSA executive director Jeff Reich
Furthermore, numerous security-centric compliance regulations, such as HIPAA, PCI DSS, and NIST 800-53, mandate some level of access management controls and policies, with the principle of least privilege access being a widely recommended guiding principle. By adhering to this principle, organizations can not only enhance their security posture but also ensure compliance with industry standards and regulatory requirements.
Strategies and Tactics for Implementing Least Privilege Access
While the concept of least privilege access may seem straightforward, its practical implementation across today’s complex and dynamic environments requires a strategic approach and the adoption of various tactics. By incorporating the following strategies and tactics into their identity security and access control processes, organizations can embark on a journey towards achieving least privilege access and fortifying their overall security posture.
1. Implement Appropriate Policies and Approvals for Sensitive Access
Establishing clearly defined access policies and approval protocols for sensitive roles and permissions is crucial to ensure consistent and controlled provisioning processes. Organizations should create standards for onboarding employees in different roles, making least privilege the default for all new accounts, and define procedures for managing role changes and offboarding to facilitate swift and comprehensive deprovisioning.
Educating all stakeholders, including employees, managers, and administrators, on the standardized access request and approval procedures, particularly those pertaining to sensitive, just-in-time access, is essential to ensure that policies are clear and easy to follow.
2. Transition Sensitive Access to Time-Based Access
The first step in achieving least privilege access is to identify mission-critical systems and catalog the individuals who possess privileged access to these resources, along with their associated permissions, roles, and group memberships. Subsequently, organizations should shift these Aponoments to a time-bound or contextually provisioned model, assuming by default that users do not require this level of access on a regular basis.
Granting access in these situations can be viewed as a “privileged action” escalation, where users who require elevated privileges to perform specific tasks can request just-in-time access tailored to their needs. By adopting this approach, organizations can ensure that users always have the necessary access when required, without being over-provisioned or retaining excessive privileges.
3. Automate Visibility into Sensitive Access
Achieving least privilege access hinges on gaining comprehensive visibility into who has access to what resources, permissions, and group memberships across the entire system. With the proliferation of Software as a Service (SaaS) and Infrastructure as a Service (IaaS) applications, and the centralization of management for these environments, maintaining this level of visibility can be a daunting challenge.
To address this, security teams should strive to automate the collection and centralization of access data, ensuring that information is up-to-date, easily accessible, and readily available for reference. Once the system inventory is in place, organizations should develop a schema for tagging roles, groups, and permissions within applications that are deemed most sensitive, enabling instant identification and prioritization.
4. Maintain a Comprehensive Catalog and Audit Trail
When users are granted sensitive access, it is imperative to log the decision, approvals, and the context under which the access is granted, creating an auditable trail. This information is not only useful for reviewing the necessity of access but may also serve as essential proof for external compliance requirements.
The catalog of current sensitive access should be easily accessible to IT, security, and governance, risk, and compliance (GRC) teams. Actively maintaining this catalog as part of the access review process is crucial, with users’ or identities’ statuses automatically updated in the catalog as part of the provisioning and deprovisioning processes.
5. Conduct Periodic Reviews of Sensitive Access
While defining least privilege access policies and maintaining an up-to-date catalog of active sensitive access are essential steps, it is equally crucial to regularly review sensitive access to ensure that currently provisioned access remains necessary. These reviews should not solely rely on the catalog of access or manually maintained audit trails but should also poll the applications and accounts directly to ensure that the latest and most up-to-date information is used for review. This approach ensures that any access provisioned outside of established business processes is identified, reviewed, and re-certified.
Collaborating with company managers and system administrators on periodic access reviews is a best practice for certifying that users have the appropriate levels of access. Additionally, following best practices for user access reviews can make the process more seamless and accurate.
6. Ensure Timely and Contextual Access Reviews
Access reviews are not only necessary for meeting compliance requirements but also serve as a critical tool for maintaining security by regularly identifying and removing unnecessary access. To uphold the principle of least privilege, access reviews should occur on a frequent and timely basis (at least once a quarter for privileged access) and be contextual (e.g., upon a significant role change). This level of ongoing effort necessitates automation, as manual processes may become prohibitively expensive and time-consuming.
Establishing a regular schedule for user access reviews, defining the scope of each scheduled review, and sharing this information with supporting teams can help ensure that resources are allocated appropriately and that reviews are adequately prepared for.
7. Provide Context on Access Decisions
Understanding the security implications of granted access, permissions, or group memberships is paramount when making access decisions. Downstream authorization implications of access may not always be apparent to approvers or reviewers. For instance, group memberships may have significant knock-on effects on granted permissions for resources and roles, which can be challenging to comprehend.
Regular access reviews should include context around risk, the account with access, and downstream implications of the grant. Helping those who grant and certify access understand the security implications of their decisions can empower them to make well-informed choices, ultimately strengthening the organization’s security posture.
Enhancing Access Reviews with Automation and Contextual Information
Effective access reviews are a cornerstone of maintaining least privilege access and ensuring compliance with industry regulations. However, manual processes can be time-consuming, error-prone, and ultimately ineffective in today’s complex environments. By leveraging automation and incorporating contextual information, organizations can streamline access reviews, enhance accuracy, and make more informed decisions.
Automating Access Reviews
Automating access reviews can significantly reduce the administrative burden and increase efficiency. Automated systems can collect and analyze access data from various sources, identify potential risks or policy violations, and generate reports for review. This approach not only saves time but also ensures consistency and reduces the likelihood of human error.
Automation tools can be configured to trigger access reviews based on predefined schedules or events, such as role changes, terminations, or detected anomalies. These tools can also facilitate the review process by presenting relevant information to reviewers, enabling them to make informed decisions more efficiently.
Incorporating Contextual Information
Providing reviewers with comprehensive contextual information is crucial for making informed access decisions. This information should include details about the user, their role, the resources they have access to, and the potential risks associated with that access.
Contextual information can be obtained from various sources, including user directories, asset management systems, and risk assessment tools. By integrating these data sources, organizations can present a holistic view of access rights, enabling reviewers to better understand the implications of granting or revoking access.
Additionally, incorporating risk scoring or risk ratings can help prioritize access reviews, ensuring that high-risk access privileges are reviewed more frequently or with greater scrutiny.
Striking the Balance: Least Privilege Access and Productivity
While implementing least privilege access is essential for enhancing security, it is crucial to strike a balance between security and productivity. Overly restrictive access controls can hinder employee productivity and negatively impact business operations. Conversely, lax access controls can expose the organization to significant security risks.
Enabling Self-Service Access Requests
One approach to balancing security and productivity is to implement self-service access request portals. These portals allow employees to request access to the resources they need, streamlining the process and reducing the administrative burden on IT and security teams.
Self-service portals can be integrated with automated approval workflows, ensuring that access requests are reviewed and approved based on predefined policies and risk assessments. This approach empowers employees to obtain the necessary access promptly while maintaining appropriate controls and oversight.
Implementing Role-Based Access Control (RBAC)
Role-Based Access Control (RBAC) is a widely adopted access management model that can help organizations achieve least privilege access while enhancing productivity. RBAC assigns access rights based on job roles or responsibilities, rather than individual users.
By defining roles and associated permissions, organizations can ensure that employees have the necessary access to perform their job functions without granting excessive privileges. RBAC simplifies access management, reduces the risk of over-provisioning, and enables efficient access provisioning and deprovisioning processes.
Educating and Training Employees
Effective implementation of least privilege access requires a strong security culture and employee awareness. Organizations should invest in educating and training employees on the principles of least privilege access, the importance of following access policies and procedures, and the potential risks associated with unauthorized or excessive access.
By fostering a security-conscious mindset among employees, organizations can encourage responsible access practices and reduce the likelihood of accidental or intentional misuse of privileges.
Continuous Monitoring and Adaptation
Achieving the balance between security and productivity is an ongoing process that requires continuous monitoring and adaptation. Organizations should regularly review their access management policies, procedures, and technologies to ensure they remain effective and aligned with business needs.
Monitoring user behavior, access patterns, and security incidents can provide valuable insights into areas that may require adjustments or additional controls. By continuously adapting and refining their access management strategies, organizations can maintain an optimal balance between security and productivity.
Addressing Challenges in Implementing Least Privilege Access
While the benefits of implementing least privilege access are clear, organizations often face various challenges in their pursuit of this principle. Addressing these challenges proactively can ensure a smoother implementation process and increase the likelihood of success.
Overcoming Legacy Systems and Technical Limitations
Many organizations rely on legacy systems or applications that were not designed with modern access management principles in mind. These systems may lack robust access control mechanisms, making it difficult to implement least privilege access effectively.
To overcome this challenge, organizations may need to explore integration solutions or third-party access management tools that can bridge the gap between legacy systems and modern access control practices. Additionally, organizations should consider migrating to more modern and secure platforms as part of their long-term strategy.
Managing Access in Hybrid and Multi-Cloud Environments
With the increasing adoption of cloud computing and the prevalence of hybrid and multi-cloud environments, managing access across different platforms and providers can be a significant challenge. Each cloud provider may have its own access management tools and policies, making it difficult to maintain a consistent and centralized approach to least privilege access.
To address this challenge, organizations should consider implementing a centralized identity and access management (IAM) solution that can integrate with multiple cloud providers and on-premises systems. This approach enables consistent access policies, centralized visibility, and streamlined access management across the entire IT environment.
Ensuring Compliance with Regulations and Standards
Compliance with industry regulations and standards, such as HIPAA, PCI DSS, and NIST 800-53, often mandates the implementation of least privilege access principles. However, demonstrating compliance can be a complex and time-consuming process, especially in large organizations with diverse IT environments.
To simplify compliance efforts, organizations should leverage automated tools and processes for access management, access reviews, and audit trail maintenance. Additionally, implementing a comprehensive governance, risk, and compliance (GRC) framework can help organizations streamline compliance activities and ensure that access management practices align with regulatory requirements.
Fostering Collaboration and Buy-In Across Teams
Implementing least privilege access often requires collaboration and buy-in from various teams within an organization, including IT, security, compliance, and business units. Lack of alignment or resistance to change can hinder the successful implementation of least privilege access strategies.
To foster collaboration and buy-in, organizations should establish clear communication channels, involve stakeholders from different teams in the planning and implementation process, and provide training and education to ensure a shared understanding of the benefits and importance of least privilege access.
Maintaining Visibility and Control in Dynamic Environments
In today’s dynamic IT environments, where users, applications, and resources are constantly changing, maintaining visibility and control over access rights can be a significant challenge. Manual processes for access management and reviews may quickly become outdated or ineffective.
To address this challenge, organizations should implement automated access management solutions that can continuously monitor and update access rights based on changes in the environment. Additionally, leveraging artificial intelligence and machine learning technologies can help organizations identify potential access risks and anomalies in real-time, enabling prompt remediation.
The Future of Least Privilege Access: Emerging Trends and Technologies
As technology continues to evolve, the implementation of least privilege access principles will also need to adapt to new challenges and opportunities. Staying informed about emerging trends and technologies can help organizations stay ahead of the curve and maintain a robust security posture.
Zero Trust Network Access (ZTNA)
Zero Trust Network Access (ZTNA) is an emerging security model that aligns closely with the principles of least privilege access. ZTNA assumes that no user or device should be trusted by default, regardless of their location or network connection.
By implementing ZTNA, organizations can enforce least privilege access at the network level, granting access to specific applications or resources based on predefined policies and user context. This approach can significantly reduce the attack surface and mitigate the risks associated with unauthorized access or network-based threats.
Privileged Access Management (PAM) Solutions
Privileged Access Management (PAM) solutions are designed to secure and control access to privileged accounts and sensitive resources. These solutions often incorporate least privilege access principles by providing granular access controls, session monitoring, and auditing capabilities.
By implementing PAM solutions, organizations can ensure that privileged access is granted only when necessary, with appropriate approvals and logging mechanisms in place. This approach can help mitigate the risks associated with privileged account misuse or compromise, further enhancing the organization’s security posture.
Continuous Adaptive Risk and Trust Assessment (CARTA)
Continuous Adaptive Risk and Trust Assessment (CARTA) is an emerging concept that combines risk assessment, trust evaluation, and adaptive access controls. CARTA continuously monitors user behavior, device posture, and environmental factors to dynamically adjust access privileges based on perceived risk levels.
By implementing CARTA, organizations can achieve a more granular and context-aware approach to least privilege access. Access rights can be automatically adjusted based on real-time risk assessments, ensuring that users only have the necessary privileges for their current context and minimizing the potential for unauthorized access or misuse.
Blockchain-Based Access Management
Blockchain technology, known for its decentralized and immutable nature, is being explored as a potential solution for secure access management. By leveraging blockchain, organizations can create a tamper-proof audit trail of access events, ensuring transparency and accountability.
Additionally, blockchain-based access management solutions can enable decentralized access control, where access policies and decisions are distributed across multiple nodes, reducing the risk of a single point of failure or compromise.
While still an emerging concept, blockchain-based access management holds promise for enhancing the implementation of least privilege access principles, particularly in environments where trust and transparency are critical.
Conclusion
Implementing the principle of least privilege access is a critical endeavor for organizations seeking to fortify their security posture, mitigate risks associated with account compromises and insider threats, and ensure compliance with industry regulations. By adopting the strategies and tactics outlined in this comprehensive guide, organizations can navigate the complexities of modern identity environments and achieve a robust least privilege access implementation.
However, it is essential to recognize that least privilege access is not a one-time effort but rather an ongoing process that requires continuous monitoring, adaptation, and alignment with emerging trends and technologies. By staying informed and embracing innovation, organizations can future-proof their least privilege access strategies and maintain a resilient security posture in the face of evolving threats and challenges. Embracing a mindset of continuous improvement and staying abreast of industry best practices will enable organizations to refine and enhance their least privilege access implementation over time, ensuring optimal security while maintaining operational efficiency.
How Apono Helps
Apono plays a pivotal role in reinforcing the Principle of Least Privilege by providing robust access management solutions that ensure users have only the minimum levels of access necessary for their roles. This approach significantly reduces the risk of unauthorized access and potential security breaches. Apono’s advanced features, including granular permission settings and real-time monitoring, allow organizations to meticulously control and review access rights. By automating the provisioning and de-provisioning processes, Apono ensures that permissions are promptly adjusted as employees’ roles change, thereby preventing privilege creep. Furthermore, its comprehensive auditing capabilities facilitate regular reviews and compliance checks, ensuring adherence to regulatory requirements and internal policies. Overall, Apono’s integration into an organization’s security framework enhances operational efficiency while upholding strict access control measures consistent with the Principle of Least Privilege.
Safeguarding your data is not just an option—it’s a necessity. Cyber threats are evolving at an unprecedented pace, and your database could be the next target. Whether you’re managing sensitive customer information or intricate analytics, database security should be at the top of your priority list. This article dives deep into the top 7 database security best practices that will help you fortify your defenses.
Importance of Database Security
In an era where data breaches are not just common but also costly, the importance of database security cannot be overstated. Every piece of data, from personal customer information to financial records, is a potential target for cybercriminals. The consequences of a breach can range from regulatory fines and legal battles to a loss of customer trust and business reputation.
Moreover, as databases become more complex and interconnected, the potential for vulnerabilities increases. It’s not just about protecting data from external threats; insider threats and accidental leaks must also be mitigated. The integrity, confidentiality, and availability of your data are the pillars upon which database security stands. Protecting these aspects ensures not only compliance with regulations but also the smooth operation of your business.
Effective database security is a comprehensive approach that includes physical, technical, and administrative measures. It’s about creating multiple layers of defense to protect against a wide range of threats. This holistic approach ensures that even if one defense mechanism fails, others are in place to prevent a breach. As we delve into the best practices for database security, keep in mind that each recommendation is a piece of a larger puzzle designed to safeguard your digital assets.
Database Security Best Practices
Regularly Update and Patch Your Database
One of the most straightforward yet often overlooked aspects of database security is the regular updating and patching of database software. Developers continuously work on improving the security features of database management systems (DBMS) and fixing vulnerabilities. When these updates are ignored, it leaves the database exposed to known exploits.
Regular updates ensure that your database is protected against the latest threats. This process should be part of a routine maintenance schedule, with patches applied as soon as they are released. In addition to security patches, updates often include performance improvements and new features that can enhance the overall efficiency of your database.
Automating the update process can help reduce the workload on your IT team and minimize the risk of human error. Many DBMS offer automatic update features, but it’s important to monitor these processes to ensure they’re functioning correctly. Testing patches in a development environment before applying them to your production database can prevent unexpected issues.
Implement Strong Access Controls
Access control is the cornerstone of database security. It involves defining who can access your database and what actions they can perform. This practice is crucial for minimizing the risk of unauthorized access and data breaches. By implementing strong access controls, you can ensure that only authorized personnel have access to sensitive information.
The principle of least privilege should guide your access control policies. This means granting users the minimum level of access necessary for their role. For example, a marketing analyst might need to view customer data but should not have the ability to modify it. Regular reviews of access privileges are necessary to adjust permissions as roles change or employees leave the company.
Authentication methods, such as passwords, multi-factor authentication (MFA), or biometrics, add an additional layer of security. Password policies should require complex passwords that are changed regularly. MFA, which requires a second form of verification beyond just a password, significantly reduces the risk of unauthorized access.
Encrypt Sensitive Data
Encryption transforms readable data into a coded format that can only be accessed with the correct decryption key. It is one of the most effective ways to protect sensitive information, ensuring that even if data is intercepted or accessed without authorization, it remains unreadable.
Data encryption should be applied both at rest and in transit. Encrypting data at rest protects it from being accessed by unauthorized users who might gain physical access to the storage medium. Encrypting data in transit protects it as it moves across networks, preventing interception by cybercriminals.
Implementing strong encryption algorithms and managing encryption keys securely are vital components of this strategy. It’s also important to consider the performance impact of encryption and balance security needs with system efficiency.
Monitor and Audit Database Activity
Monitoring and auditing database activity is essential for detecting potential security breaches and ensuring that access controls are effective. This process involves tracking all access to the database and recording actions such as data queries, modifications, and login attempts.
An effective monitoring strategy can help identify suspicious activity, such as repeated failed login attempts or unusual data access patterns, which could indicate a security threat. Audit logs also provide valuable evidence in the event of a breach, helping to identify the source and scope of the intrusion.
Implementing automated monitoring tools can simplify the process and provide real-time alerts to potential security incidents. However, it’s important to regularly review audit logs and adjust monitoring parameters to ensure that you’re capturing relevant information without being overwhelmed by data.
Backup Data Regularly
Regular backups are a critical component of any database security strategy. In the event of data loss due to hardware failure, cyberattack, or human error, backups ensure that you can restore your database to its previous state.
Backup procedures should be established as part of a larger disaster recovery and business continuity plan. This includes determining what data needs to be backed up, how frequently backups should occur, and where backups are stored. Off-site or cloud storage can provide an additional layer of protection against physical threats, such as natural disasters.
Testing your backup and restoration processes regularly is essential to ensure that they work as expected when needed. This practice helps identify any issues before they become critical, minimizing downtime and data loss.
Limit Database Exposure and Minimize Attack Surface
Limiting database exposure and minimizing the attack surface requires a combination of stringent access controls, network segmentation, regular maintenance, encryption, and vigilant monitoring. By adopting these practices, organizations can significantly enhance their database security posture and protect their valuable data assets from cyber threats.
First and foremost, implementing strong access control measures is crucial. This involves defining user roles and granting permissions based on the principle of least privilege, ensuring that individuals have access only to the data necessary for their role. Additionally, employing robust authentication mechanisms, such as multi-factor authentication (MFA), adds an extra layer of security by verifying the user’s identity using more than one method of validation.
Network segmentation plays a vital role in minimizing the attack surface. By isolating the database servers in a secure network segment or demilitarized zone (DMZ), organizations can limit access to sensitive data and reduce the risk of lateral movement within their networks. Furthermore, utilizing firewalls and intrusion detection/prevention systems (IDPS) to monitor and control incoming and outgoing network traffic can thwart potential attacks.
Regularly updating and patching database management systems (DBMS) and associated applications is another critical step. Cybercriminals often exploit known vulnerabilities; hence, keeping software up to date closes these security gaps. Additionally, conducting routine security audits and vulnerability assessments helps in identifying and mitigating potential weaknesses before they can be exploited.
Data encryption, both at rest and in transit, ensures that even if unauthorized access is gained, the information remains unintelligible and useless to attackers. Lastly, implementing comprehensive monitoring and logging can aid in the early detection of suspicious activities, enabling timely responses to mitigate threats.
Educate and Train Employees on Permissions Management Security Best Practices
Teaching employees about permissions management security best practices is an essential step in fortifying an organization’s data integrity and safeguarding its intellectual property. Permissions management refers to the process of defining and regulating access to resources within an IT environment, ensuring that individuals have the appropriate level of access required for their role. This not only minimizes the risk of accidental or deliberate data breaches but also aids in the smooth operation of business processes by facilitating the right access to the right individuals at the right time.
A comprehensive understanding of permissions management among employees helps in creating a culture of security awareness where every member recognizes their role in maintaining the security posture of the organization. It prevents instances of ‘over-permissioning’, a common issue where users are granted more access rights than needed, which could potentially be exploited by malicious actors. Additionally, educating employees on this topic empowers them to identify and report any anomalies or vulnerabilities related to access controls, thereby acting as a first line of defense against security threats.
Moreover, regulatory compliance demands strict adherence to permissions management protocols. Many industries are subject to regulations that mandate the protection of sensitive information through stringent access controls. Employees well-versed in permissions management best practices are invaluable assets in ensuring that their organization remains compliant with these regulations, avoiding potential legal and financial repercussions.
Apono Safeguards Your Data
Apono is a robust platform designed to enhance database security through a comprehensive suite of features tailored to protect sensitive information and ensure compliance with regulatory standards. One of the primary ways Apono bolsters database security is by providing advanced access control mechanisms. These mechanisms allow organizations to define and enforce granular permissions, ensuring that only authorized personnel can access specific data sets. By employing role-based access control (RBAC) and attribute-based access control (ABAC), Apono minimizes the risk of unauthorized data access, thereby safeguarding the integrity and confidentiality of the database.
In addition to access control, Apono offers sophisticated monitoring and auditing capabilities. Continuous monitoring of database activities enables real-time detection of suspicious behaviors and potential security breaches. Detailed audit logs provide a chronological record of all access and modification events, which is crucial for forensic analysis in the event of a security incident. Furthermore, these logs assist organizations in meeting compliance requirements by providing evidence of adherence to data protection regulations such as GDPR, HIPAA, and CCPA.
Another critical aspect of Apono’s approach to database security is its emphasis on user education and awareness. The platform offers training modules and resources to help users understand security best practices and the importance of maintaining secure database environments. By fostering a culture of security awareness, Apono empowers organizations to proactively address potential vulnerabilities and mitigate risks effectively.
Overall, Apono’s multifaceted approach to database security encompasses access control, monitoring, encryption, and user education, making it an indispensable tool for organizations aiming to protect their critical data assets.
In today’s increasingly complex digital landscape, safeguarding sensitive data has never been more critical. Yet, many organizations grapple with balancing accessibility and security within their databases. Enter the concept of least privilege access, a pivotal strategy designed to minimize vulnerabilities by ensuring users have only the permissions essential for their role. However, scaling this principle across large-scale environments poses unique challenges and opportunities. How can businesses effectively implement and manage least privilege access to bolster their database security?
Importance of Least Privilege Access in Database Security
The principle of least privilege access is not just a best practice; it’s a critical pillar in the foundation of database security. By ensuring that individuals have access only to the resources and information absolutely necessary for their duties, organizations can significantly reduce the attack surface available to malicious actors. This approach is not only about limiting what users can see or do; it’s also about protecting the integrity of your data and the continuity of your business operations.
In a world where data breaches are both costly and damaging to a company’s reputation, employing a least privilege model is a proactive step towards mitigating risk. It’s a strategy that, when properly implemented and scaled, can be the difference between a secure database and a potential headline in tomorrow’s news.
However, the journey towards achieving this level of security is fraught with challenges. The dynamic nature of businesses, coupled with the ever-evolving threat landscape, means that what works today may not suffice tomorrow. The key lies in understanding these challenges, and systematically addressing them through a well-orchestrated strategy that scales with your organization’s needs.
Challenges in Scaling Least Privilege Access
Scaling least privilege access across an organization’s databases is not without its hurdles. One of the primary challenges lies in the sheer volume and variety of users, roles, and permissions that need to be managed. As organizations grow, so does the complexity of their databases and the data they contain. This complexity can make it difficult to accurately define and enforce the necessary restrictions for each user.
Moreover, the evolving nature of job roles and responsibilities means that access requirements can change frequently. Keeping up with these changes, and ensuring that access levels are updated accordingly, can be a time-consuming task. This is compounded by the lack of visibility and control over who has access to what, making it difficult to detect and rectify inappropriate access rights before they can be exploited.
Another significant challenge is the technical debt associated with legacy systems. Older systems may not have been designed with the flexibility needed to implement least privilege access effectively. Upgrading or replacing these systems can be a daunting task, both from a financial and operational perspective.
Key Principles of Implementing Least Privilege Access
Implementing least privilege access effectively requires a thoughtful approach that encompasses several key principles.
First and foremost, organizations must adopt a comprehensive understanding of their data landscape. This involves mapping out all data assets, understanding their sensitivity, and identifying who needs access to what data, and why.
Once this foundation is laid, the next step is to establish clear policies and procedures that define how access is granted, reviewed, and revoked. These policies should be enforced consistently across all databases and systems, ensuring that any exceptions are well-documented and justified.
Automation plays a crucial role in scaling the implementation of least privilege access. Manual processes are not only resource-intensive but are also prone to errors. Automating the provisioning, de-provisioning, and review of access rights can help ensure that policies are applied consistently and efficiently, without overwhelming IT teams.
How Apono Helps
Apono significantly enhances the ability to scale least privilege access for databases by providing automated policy management, comprehensive auditing, seamless integration, dynamic provisioning, and advanced analytics. These features collectively enable organizations to maintain strict control over database access while supporting growth and complexity in their IT environments. By leveraging Apono, businesses can ensure that they uphold the principle of least privilege effectively, mitigating risks associated with unauthorized access and safeguarding their valuable data assets.
What is Azure Identity Protection and 7 Steps to a Seamless Setup
Protecting credentials has become increasingly critical in recent years, with everyday employees using more passwords, devices, and systems than ever before.
Remote work has significantly increased the risk of identity attacks. 55% of remote workers say they receive more phishing emails than they used to while working in the office and attempted password attacks are up tenfold.
In 2023, Microsoft detected 156,000 business email compromise (BEC) attacks every day over twelve months. As a result, tools such as Microsoft’s Azure Identity Protection have become a staple in protecting against compromised identities, account takeover, and misuse of privileges.
With a strong identity protection foundation, your organization can adopt zero trust and confidently progress toward a dynamic, identity-centric model that keeps credentials safe.
What is Azure Identity Protection?
Azure Identity Protection is a security service that provides a robust defense mechanism for user identities and access privileges within the Azure ecosystem. It analyzes data from various sources, such as user logins, device profiles, and application usage, to comprehensively assess potential identity-based risks.
Azure Identity Protection is a feature of the Azure Active Directory (AD), which employs machine learning capabilities to detect inconsistent access patterns, atypical login behavior, and potential identity threats. The Azure AD service ensures that organizations can automate the detection and remediation of identity-based vulnerabilities and provide conditional access to applications and data in line with your data security policy.
Why does your organization need Azure Identity Protection?
Real-Time Risk Detection
Azure Identity Protection evaluates real-time sign-in detections during each sign-in attempt to assign a risk level to the session. This continuous monitoring helps identify suspicious activities such as the use of anonymous IP addresses, password spray attacks, and credential exposure.
Automated Response Policies
Depending on the risk level assessed during the sign-in attempt, automated policies are enforced to safeguard both the user and your organization. These policies are essential in mitigating potential threats before they escalate and contributing to your anti-phishing toolkit.
Comprehensive Reporting Tools
Azure Identity Protection offers three critical reports for administrators: Risk Detections, Risky Sign-ins, and Risky Users. These reports are crucial for tracking and analyzing identified risks, allowing for timely intervention.
Integration with Azure Active Directory
As a feature within Azure Active Directory, Azure Identity Protection benefits from seamless integration with other Microsoft security tools. This integration enhances the overall security architecture, providing a unified identity and access management approach. Similarly, other tools like AWS Access Analyzer are designed to complement and meet the specific needs of other cloud providers, such as AWS.
Exportable Data for Further Analysis
Data concerning identity risks can be exported to various tools for additional analysis. This capability allows your organization to archive data, conduct further investigations, and correlate findings with other security events.
Access Control and Licensing Requirements
Access to Azure Identity Protection features requires users to have specific administrative roles such as Security Administrator, Security Operator, or Security Reader. Additionally, utilizing this service requires Microsoft Entra ID P2 licenses, ensuring that only authorized personnel handle sensitive security tasks.
3 Key Features of Azure Identity Protection
Risk-based Conditional Access
Unfortunately, in cybersecurity, no one size fits all. Azure Identity Protection acknowledges this by offering risk-based conditional access, a feature that tailors security measures to the specific risk level of a sign-in attempt or user profile. This adaptive approach ensures that access to resources is granted in a manner that balances security and user convenience.
Risk-based conditional access operates on the principle of evaluating the risk associated with a user’s sign-in behavior. Azure Identity Protection considers factors such as the user’s location, the device being used, and the application being accessed. Depending on the assessed risk, conditional access policies can then enforce appropriate security measures in line with your IT security policy, ranging from requiring multi-factor authentication (MFA) to blocking access entirely.
This feature shines in its ability to provide dynamic protection. For instance, if an employee attempts to access corporate resources from a previously unknown location using an unfamiliar device, the system might flag this activity as high risk. Consequently, it could prompt additional authentication steps or restrict access, mitigating potential threats in real time.
Central to Azure Identity Protection’s arsenal are its identity protection policies. These policies serve as the framework for organizations to define and enforce their security protocols. By customizing policies, your business can tailor the security mechanisms of Azure Identity Protection to meet your unique needs and requirements.
Identity protection policies encompass a wide range of settings and options. They allow administrators to specify the conditions under which users must undergo multi-factor authentication, define risk levels for different identity threats, and set up automated responses to detected risks. This level of customization ensures that organizations can enact security measures that are both effective and aligned with their operational practices.
Moreover, these policies are not static, especially if you use processes like a dynamic risk assessment. As the threat landscape evolves, so can the policies, enabling your organization to adapt its security stance in response to new challenges. This flexibility is crucial in maintaining a robust defense against cyber threats and ensuring security measures remain effective over time.
Identity Risk Events and Alerts
Awareness and timely response are vital in mitigating identity-related threats. Azure Identity Protection excels in this aspect by providing comprehensive monitoring and alerting capabilities. Through its dashboard, administrators gain visibility into identity risk events and alerts, enabling them to assess and respond to potential security incidents quickly.
Identity risk events encompass a range of anomalies and indicators of compromise, such as atypical sign-in activities or patterns that suggest a user account may have been compromised. Azure Identity Protection detects these events and categorizes them based on severity, allowing administrators to prioritize their response efforts.
Alerts serve as the immediate notification system for these risk events, ensuring that the right personnel are informed of potential issues in a timely manner and facilitating swift action. Whether initiating an investigation, resetting a user’s password, or enforcing additional authentication measures, alerts empower your organization to react quickly and decisively to mitigate risks.
7 Steps to a Seamless Setup With Azure Identity Protection
You can follow these seven steps to ensure a seamless setup with Azure Identity Protection as part of a multi-layered security strategy. These tips provide peace of mind that user identities are being actively guarded against ever-evolving cyber threats like social engineering and credential stuffing.
Enable Azure Identity Protection
Sign in to the Azure portal with an account that’s been assigned at least the Security Administrator role. Navigate to the “Azure Active Directory” > “Security” > “Identity Protection” and enable the service.
Configure User Risk Policies
Set up policies to define what constitutes risky behavior for your organization. These policies can include sign-in risks based on user actions that suggest their credentials have been compromised. Configure appropriate responses, such as requiring a password change or multi-factor authentication (MFA), when risky behavior is detected.
Configure Sign-in Risk Policies
Like user risk policies, sign-in risk policies monitor the sign-in process for suspicious activities. Based on the risk level detected (low, medium, and high), automatic responses can be triggered to prevent unauthorized access.
Review Risky Users Report
Regularly review the “Risky Users” report provided by Azure Identity Protection to understand which users are considered at risk and why. This will help fine-tune your policies and ensure they align with your security requirements.
Investigate Risk Events
Utilize the risk event investigation features to investigate suspicious activities more thoroughly. Check out corresponding logs, user profiles, and related events that could provide insights into potential security issues.
Automate Responses
Take advantage of automated responses to address identity risks efficiently. For instance, you can automate MFA enforcement or temporarily block access while investigating a potential threat.
Monitor and Adjust
Security is an ongoing process, and you can implement continuous security automation and monitoring to keep an eye on the effectiveness of your Azure Identity Protection setup. Based on evolving threat patterns and organizational needs, make adjustments as necessary.
You can also integrate other tools as necessary, including Microsoft-specific offerings. For example, by using Azure AD Security Groups, your organization can streamline access management, and when combined with Azure Identity Protection, you can ensure that these identities are monitored for suspicious activities. This dual approach enhances the overall security posture by protecting both the infrastructure and the identities accessing it.
Azure Identity Protection and Apono
Organizations are increasingly seeking additional layers of protection in tandem with the security services Azure Identity Protection provides. The Apono platform enables your business to create, manage, and enforce fine-grained access policies across cloud environments. Apono complements existing IAM solutions, such as Azure Identity Protection, by adding another layer of control and visibility.
With an intuitive interface, Apono simplifies the management of access permissions, ensuring that only authorized individuals have access to sensitive resources. Integrating Apono with Azure Identity Protection helps your organization achieve a more holistic approach to IAM. By using Azure Identity Protection’s advanced detection capabilities alongside Apono’s policy enforcement tools, your business can achieve a more secure and compliant posture. This integration can be especially effective in industries where regulation requires strict control over data access and user authentication. Get started with Apono for free.
Google Cloud Platform (GCP) is one of the world’s most widely used cloud services. At the heart of this system lies roles, which act as predefined sets of permissions that grant users specific access levels amidst the complexity of credentials, identities, and resources in the cloud environment.
74% of data breaches originate from the misuse of privileged credentials, which is why it’s so critical to learn the ins and outs of GCP IAM roles and add an additional layer of protection to your data and services.
What are GCP IAM Roles?
Google Cloud Platform (GCP) Identity and Access Management (IAM) roles are a fundamental component designed to help manage access control and permissions within GCP environments. These roles are collections of permissions that determine what actions an identity (a user, group, or service account) can perform on GCP resources.
IAM roles provide a flexible and secure way to manage who has access to GCP resources and what actions they can perform, ensuring that only authorized individuals can access sensitive data and perform operations within a GCP project.
Three Types of GCP IAM Roles
Effectively managing IAM roles is crucial for securing GCP environments against unauthorized access and potential security breaches. By understanding the structure and purpose of these roles, your organization can implement robust access control policies (often outlined as a critical part of any good IT security policy) that protect resources while facilitating smooth operations across cloud environments.
GCP IAM roles are categorized into three main types: Basic, predefined, and custom.
Basic roles, formerly known as ‘primitive roles,’ are the most broad and straightforward options available. These roles encompass a vast array of permissions spanning multiple Google Cloud services, granting users extensive access within a project. The three primary basic roles are:
Owner: Grants complete control over a project, including the ability to manage roles, permissions, and billing settings.
Editor: Permits modification and creation of resources within a project, excluding certain sensitive operations.
Viewer: Grants read-only access to resources, enabling users to view but not alter existing data or configurations.
While basic roles offer unparalleled simplicity, their far-reaching permissions can pose significant security risks if misused. As a general guideline, it is advisable to reserve basic role assignments for testing or sandboxed environments and avoid their use in production scenarios involving sensitive data.
Predefined roles offer a balanced approach to access control. These roles provide granular access to specific Google Cloud services, ensuring users receive only the permissions necessary to perform their assigned tasks. By adhering to the principle of least privilege, predefined roles enhance security, identity governance, and reduce the risk of unintended data exposure or resource misuse.
For example, the BigQuery service offers predefined roles such as BigQuery Admin, BigQuery Data Owner, and BigQuery Job User, enabling precise access control for various data management tasks.
One key advantage of predefined roles is their seamless integration with Google Cloud’s evolving feature set. As new services or capabilities are introduced, Google automatically updates the corresponding predefined roles with the necessary permissions, ensuring users remain empowered with the latest access privileges without manual intervention.
Custom Roles
Custom roles emerge as a powerful solution when predefined roles fail to meet your organization’s specific requirements and evolving cyber threats. Custom roles enable administrators to meticulously curate a unique set of permissions, granting users access to only the resources and actions they genuinely require.
The creation of custom roles is a two-fold process. First, your organization must identify the specific permissions needed for a particular task or job function. Then, you can bundle these permissions into a custom role, ensuring a precise and tailored access control mechanism.
While custom roles offer unparalleled flexibility, they also introduce additional complexity and maintenance overhead. Your organization must diligently monitor and update custom roles as new permissions or services are introduced, ensuring their continued relevance and effectiveness.
Log into your Google Cloud Console. This is the web interface where you can manage all aspects of your GCP resources.
Navigate to the IAM & Admin section on the dashboard. This area is dedicated to identity and access management, where you can oversee roles, permissions, and the organizational structure of your resources.
Learn the hierarchy of GCP resources. GCP organizes resources into projects, folders, and organizations. This hierarchy influences how IAM roles are inherited and applied. It’s crucial to understand this structure as it will dictate how you assign roles at different levels (project, folder, or organization) to meet your access control requirements.
Identify the roles that suit your needs. GCP offers a wide range of predefined roles, each encapsulating a set of permissions designed for specific tasks within the platform. These roles range from broad (Owner, Editor, Viewer) to service-specific (e.g., Compute Admin, Storage Object Admin). Assess the responsibilities of your team members and select the roles that best match their needs. If necessary, you can also create custom roles with a tailored set of permissions.
Assign the appropriate roles. In the IAM & Admin section of the Google Cloud Console, navigate to the IAM page. Here you can add members (users, groups, and service accounts) and assign them roles. When adding a member, you’ll enter their email address and select the role from a dropdown menu. It’s important to apply the principle of least privilege—only grant the permissions necessary for users to perform their tasks. Optionally, for more advanced scenarios, consider setting up conditional IAM policies. These policies allow you to specify conditions under which the assigned roles are effective. For example, you might restrict certain actions to specific IP ranges or times of day. This adds an extra layer of security and control over how and when your cloud resources can be accessed.
Regularly review and audit your IAM settings. GCP provides tools for monitoring access logs and analyzing permissions. Use these tools to ensure that only authorized users have access and use their permissions responsibly. Regular audits and risk assessments help maintain a secure and efficient access management system by identifying unused roles or overly permissive settings that could be tightened.
Using Apono with GCP IAM Roles
Mastering the art of role assignment within Google Cloud Platform’s Identity and Access Management framework is a critical endeavor for organizations seeking to strike the perfect balance between security and operational efficiency. By understanding the nuances of basic, predefined, and custom roles, organizations can meticulously tailor access privileges to align with their unique requirements and risk profiles.
Embracing principles such as least privilege, separation of duties, and periodic access reviews can help you cultivate a secure and well-governed environment with seamless integration with identity providers and robust logging and monitoring capabilities. Within this context, Apono can significantly enhance the management of GCP IAM roles, offering a layer of automation and oversight that simplifies the complexities of permissions management.
Apono integrates seamlessly with GCP IAM, giving administrators a more intuitive and granular control over roles and permissions. Using Apono, you can automate the assignment and revocation of IAM roles based on user activities, job functions, or defined policies. This feature reduces the administrative burden and minimizes the risk of human error, ensuring that only the right individuals have access to sensitive resources at the right time. Moreover, Apono’s capabilities extend to monitoring and auditing, giving teams clear insights into permissions usage and anomalies, which is critical for compliance and security governance.